
Today, we have a wide assortment of products to make our grooming jobs easier. They give us better results and may even help us do the job faster. It could be anything from a shampoo, to a coat conditioner. It might be a magical spray or powder you apply to the coat. Take a look at any grooming catalog and you’ll find a vast array of items from a variety of manufacturers that can take care of just about anything you could need.
 But how do you know exactly what to reach for when a unique situation presents itself? Sometimes you don’t always know what you need. Or maybe what you need is a specialty item and you don’t have it at your fingertips. What do you do then?
Smart groomers and stylists often turn to home remedies. Years before we had the variety of products we do today, most clever groomers turned to their own cabinets for solutions. They used their ingenuity and developed home remedies to solve their grooming dilemmas.
Recently on the Learn2GroomDogs.com set, we had an unusual situation. Luckily, we had the masters of home remedies in for a filming weekend, Lisa Leady and Suesan Watson. (If you haven’t caught their L2GD lesson on home remedies – click here! Not only is it educational, the sister duo missed their true calling as a comedy routine!)
All of the dogs for that filming weekend were dogs that were supplied to us, sight unseen. We’d simply made the request for eight dogs.
The criteria was:
- They needed enough fur so that Lisa and Sue could actually groom them.
- The dogs needed reasonably nice temperaments.
That’s it.
While we were at lunch, the dogs were checked in. Our team had placed them in a holding area to await their afternoon film session. When we returned, we were excited to see what was we had to film. I knew all our afternoon dogs were mixed breeds that had come from a large 300+ dog puppy mill rescue that took place a few years ago. Luckily, all of the dogs found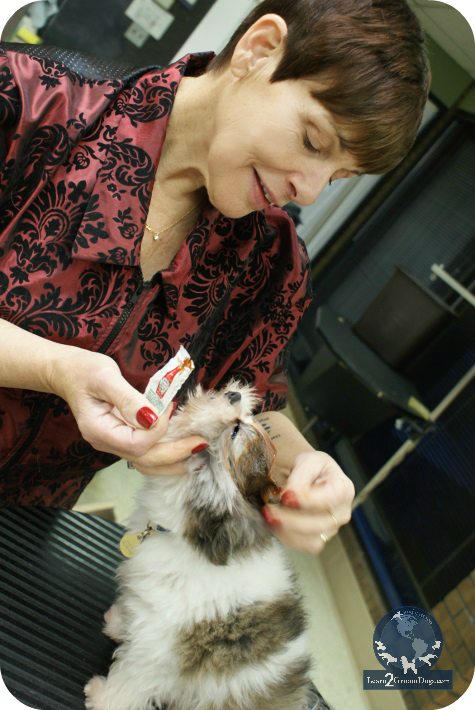 loving homes. The family supplying the dogs for the Learn2Groom film shoot had adopted three of the puppies. Many of the rescued pets were Shih Tzus, Pomeranians, Malteses, or mixes of the three breeds.
When we walked into the kennel room at the Paragon School of Pet Grooming, we were so excited. Every dog was adorable! But one really stood out – a Pomeranian/Shih Tzu mix. It had plenty of coat that brought out a few key features, making him even more appealing. But it did have a problem – and it was smack dab on the top of his head: a huge, rusty-colored lick stain.
If you’ve been in this profession for any amount of time, you know exactly what we were looking at. Apparently, one of his four-legged siblings had taken to cleaning the top of his head on a frequent basis. The constant licking had turned the white fur a rusty red color. He also had a fair amount of rust staining near his eyes and around his mouth.
Sue immediately reached for this little cutie. As she was snuggling with him she looked me right in the eyes and said, “Do you have any ketchup?”
What?
Why did Sue want ketchup?? Even though I hadn’t said a word, my expression must have asked the question.
Sue quickly went on to explain that ketchup would lighten the stain on the top of the dog’s head. “Really?” I exclaimed. I didn’t bother to question her – I knew she had something good up her sleeve. Sue said it didn’t matter what brand of ketchup we chose – any ketchup would work. I quickly went and found a couple packets of ketchup in the kitchen and handed them to her.
We took the dog out onto the practical skills floor and set him on a grooming table. Sue simply opened a package of ketchup and started to apply it to the dry coat. She generously worked it into the top of his head, under his eyes, and on his muzzle area. Once the ketchup had thoroughly saturated the hair, we set this little guy aside to sit for about 30 minutes before bathing him.
I was amazed after Sue bathed and dried this little dog. The rust-colored staining was significantly lighter! Was it gone altogether? No. But it was considerably lighter on the top of his head. Around his eyes and on his muzzle area it was almost totally removed.
I was astounded.
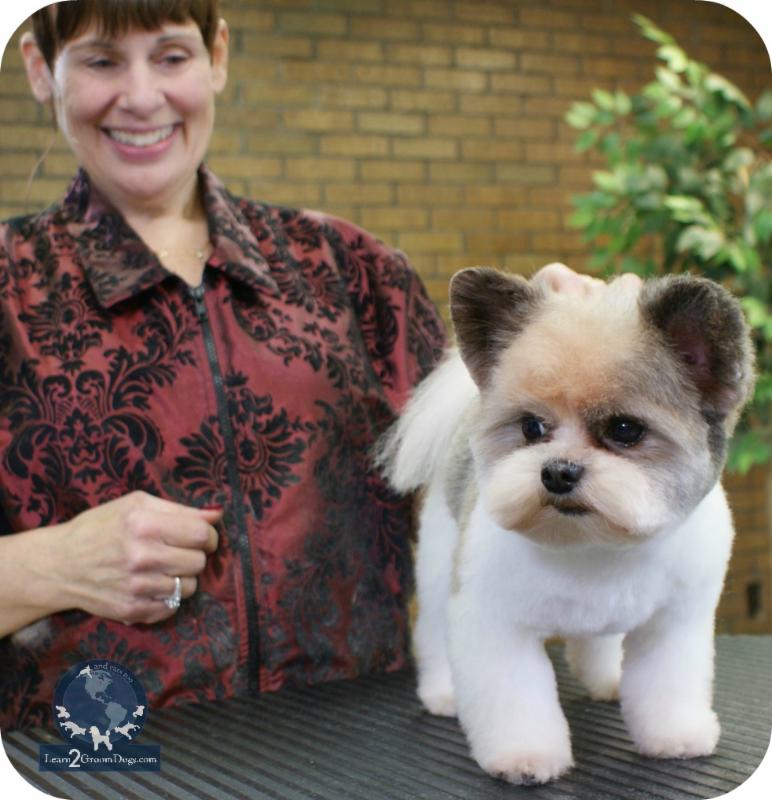 Sue suggested that we do a couple more applications in the future to really lighten the top of his head.
After seeing what a single application of ketchup (yes ketchup!) had done to brighten this dog’s coat, there was no doubt in my mind that a few more applications would lighten the stain even further.
I love home remedies when it comes to grooming. These problem-solvers are made from items that you just naturally have on hand. Many times they are common pantry items that all of us have hidden away in drawers or cupboards.
Who knew you could use ketchup to lighten and brighten the coat? It was a new one for me.
Watch for Suesan Watson in an upcoming Learn2GroomDogs.com video lesson featuring this adorable little Pomeranian/Shih Tzu mix. Join today!
Happy Trimming!
~ Melissa
P.S.
Do you have any tricks like this one? Tell us about them on the Learn2GroomDogs Facebook page.
 1. Step into the session with a very open mind.
 As your knowledge and skills advance, the clinics won’t be as daunting. They will become a great way for you to fine-tune your skills. You can begin to network and exchange thoughts with others in the industry who can provide insight when you need it. Plus, these types of functions are a great way to invigorate your career.
 When I was a contest groomer, I always did my Poodle cuffs by hand. I would brush the coat down then give it a quick fluff with my comb. Once it was fluffed, I’d glide a long straight shear in and set the lower edge. Then I’d re-fluff and grab my long curved shears to round and bevel the edges. It was time-consuming.
 Once my cuff was set, I would neaten and finish the entire leg with shears, smoothing out my guard comb work.
 Stop and hold the foot with your fingers coming to rest right at the clipped cuff line. While maintaining your hold on the foot, gently trim at right angles around the cuff with the #30 or #40 blade. Simply touch the coat at the edge line you want to set.


 I saw this quote recently and it really got me thinking.
 If you ask people in our industry if they think grooming and styling pets is an art form or a skilled trade, most would say that it’s a little of both. I agree. When you watch members of GroomTeam USA at work, their efforts are definitely works of art. Skills like theirs take years to develop. Today, I want to talk about one aspect of that development: learning to see like an artist.
 So I’m staring at the page… what am I looking at? What am I looking for? When I’m staring at that blank sheet of paper, I’m seeing what I will put there. As I stare into that whiteness, I’m watching the colors and lines take shape in my mind and align themselves on the page. It’s like my mind has produced a transparency of the finished product and has mentally created an overlay onto the page. All I have to do is put the marks on the paper. If I’m sculpting, I’m staring at the lump of rock and seeing the shape of what I want to create in the stone. All I have to do is remove all the stuff around it and let it out.
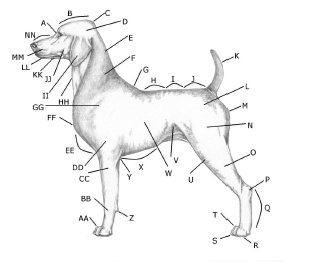 Trim styles are all about anatomy. Groomers need to know their breed standards and to know them they need to understand anatomy. If you’re a visual learner, get out your reference material and study the images until you can see them on any dog that walks into your salon. If you’re a tactile student and learn by doing, get those books out and learn to find reference points on dogs through your sense of touch. Feel where the point of rump is, the point of shoulder, and the barrel of the chest. If you can’t see them, learn your anatomy reference points by touch. Then learn to do both. Developing your knowledge base creates reliable instincts and reflexes.
 Let’s take a little poll:
 “I’ve grown a lot by working here.”
 THE RECLUSE